Thursday, June 30, 2011

Thursday's Dream Schemes/Colorway Challenge Purple and Yellow

I have to begin this week by saying that on Saturday several of the team will be involved in a July 2nd blog hop with another team of people. We are giving away a couple of stencils in conjunction with this...so hop along on Saturday and you can go to Pam Hornschu's site to learn all the details and could even start there on Saturday. Lots of other prizes will be given away so follow her name on the sidebar at the right to learn more. I won't be involved here on this site but you can navigate to her site from here if you get lost. Free stencils are always fun!


This week design team member Laura Drahozal has chosen a colorway of purple and yellow. I have taken a few liberties with the color and interpreted yellow as Yellow/Gold. I did this because when I went to my craft cupboard I happened to pull out a jar of Dreamweaver Pearlescent Embossing Paste (DPP) that I had dumped a teaspoon of Goldfinch colored Metallic F/X into a few weeks ago when I was trying to make a yellow iridescent mixture...in fact now that I think about it... I had also mixed in about two tablespoons of Dreamweaver Matte Yellow Embossing Paste (DMYP). When I opened it up, it appeared fairly "yellow" iridescent and then Violá! that was it...a light went on in my brain as I went through this scurry flurry process of trying to find the perfect "yellow" color for this week's colorway. Then I went to my paper closet and started trying to find the right color of purple...well I found a packet of fusible synthetic suede that had been there for eons. It was a rich deep color of purple and I decided that I had obviously been hoarding it for just this occasion. YAY!!! So gold is just another form of yellow...right? Might as well use what you have in stock when time is short. 

Well my second liberty happens to be my choice of a background stencil that I used with that lovely golden "goop".  Yes, the design team is going to be very annoyed with me this week, because I am using a new design that will not be available until August and I usually don't let them tease the customers with things that are not yet available. Sorry to tease you with this, but I just couldn't resist. Technically it is an older design made larger and just slightly different in the design. But this wonderful Optical art design is now the LJ size of stencil. Several years ago I discontinued it in the LG size category and in August look for it at your favorite retailer as Optical/Art (LJ915). I paste-embossed this background onto the purple suede using our new paste spreader tool (LM2010). Then on a piece of navy cardstock I paste-embossed the pear stencil (LL563) using the Dreamweaver Matte Black Embossing Paste (DMBP). Once it was dry (approx. 25 min. later) I repositioned the clean/dry pear stencil onto the pasted pear design and pasted a second layer of paste this time using the Dreamweaver Crackle Embossing Paste (CEP). The reason I pre-pasted with the Matte Black Paste is because it creates stability for the second layer of Crackle Embossing Paste. Otherwise the crackle paste might just crack off the paper. Once this second layer of paste is dry and completely crackled (if I lay it on my pancake griddle on a low setting it only takes 20 minutes) I reposition the pear stencil onto the design and then I stencil it with pigment inks. I started with a base of yellow and then shaded with reds and a variety of greens. Then I cut it out using a craft knife and mounted it onto my background with foam mounting tape. I have always loved this pear stencil design...it is truly a classic and everyone should have it in their bag of stencil goodies. 

This week I have a special post done by a student of Marj Marion. Remember I posted a card design done last week by this wonderful stencil teacher in Lacey, WA. The store where Marj teaches is called Art 'N Soul and her student Peggy has taken many many many of Marj's classes. She paste-embossed this darling snail stencil (LM290) with Dreamweaver Glossy Black Embossing Paste (DGKP) and then once it was dry she daubed it with the Stamp & Stick Glue Pad (GSP) and then stenciled on top of the glue with mica powders. Thank you Peggy for sharing this card design with Marj and thank you Marj for passing it on to me. 


Remember we would love to share your creations on the blog...you can email them to me digitally at my email address: lynell@dreamweaverstencils.com or you can send them to me physically via US postal service. Contact me at my email and I will let you know where to mail it. You can also play along with our colorway challenge this week by linking below to Mr. Linky. If you don't get a chance to play along please take time to follow the Dream Team's creations. Their names are listed at the sidebar on the right. Many of them teach all over the United States and even Nova Scotia and they list their classes on their sites. Enjoy!

Thursday, June 23, 2011

Thursday's Dream Schemes/Free Challenge this Week!

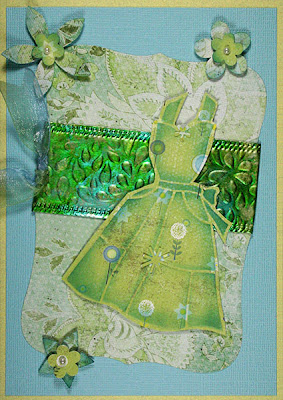
This beautiful card was crafted by Marj Marion. She is a teacher in the Pacific Northwest and teaches stamping and stenciling at a store in Lacey, Washington called Art 'n Soul (right next door to Olympia). 


The apron stencil (LG736) was dry embossed on a patterned paper and then stenciled with turquoise/teal ink to highlight the edges of the apron.  


The metal band of turquoise colored aluminum was dry embossed through an embossing machine using a patterned background stencil (LJ899). The stencil was then removed and a metal edging tool was rolled along each edge of the now embossed aluminum strip. The Adirondack alcohol ink (the color is called lettuce) and Pearl Mixatives were daubed onto the metal to create a colorful background for the apron, which has been cut out and mounted onto the metal and decorative paper.


The flowers were created by punching out decorative paper and shading the edges with contrasting inks. The centers are small pearls added for a finishing touch. 


Would love to have you create along with us this week. If you don't have a blog just mail me your creation and I will share it with our readers. Be sure to leave a comment for Marj and it would also be great to have you make the rounds of the design team members as they share their card designs this week. Their names are on the sidebar to the right...just click on one and see what stencil and technique they have used for this week's free challenge.

Thursday, June 16, 2011

Thursday's Dream Schemes/Sketch #7


This holiday is like Mother's Day for me. It is great when you can say that the Father in your life has created many wonderful memories for you. Some of my earliest memories were the "road trips" I used to take with Dad. He was a truck driver and my three siblings and I used to take turns in the summertime taking trips with him. I can remember looking at all the beautiful scenery and we played lots of road games and even had a bird watcher's list. He did love his kids and as I got older our "trip" conversations turned to "the national debt" and the "federal reserve system", political topics and where the nation was headed. He had a great influence on my values and opinions. He also loves to collect anything from barbed wire to books on the old west. And all those years of trucking my Dad wore cowboy boots. So Dad this one is for you....

Deborah March's Sketch #7
This week I was inspired by Dream Team member Wendy Jordan. She did a cowboy boot in her post this last week using the damask (LJ907) and I thought it was so beautiful. Check out her blog from Thursday of last week.

So I CASEd Wendy's cowboy boot (LG660) by paste-embossing on white paper with the Matte Black Embossing Paste (DMBP) and then after it was dry I paste-embossed with Glossy White Embossing Paste (DGWP) by leaving the cowboy boot in position and layering the damask stencil (LJ907) on top of it. Just a reminder I used a bit of tape to mask out the sole and heel of the boot, so the damask design would not be on that portion of the boot. Then for the other side of the card I just reversed this process. Black paper with the main part of the boot Glossy White Embossing paste ...etc.

The center red circle became the area for my sentiment and I had to digitally print out a Happy Father's Day, because I didn't plan in advance and the circle was too small to use my favorite Happy Father's Day stencil (LM244). Sometimes you just have to make do.

As we begin this week's challenge don't feel as if you need to do a design for Father's Day. Use Deborah March's sketch challenge in another way and join us by posting next week after Father's Day. If you don't have a blog and just enjoy stenciling your cards for your own pleasure we understand. But if you send me one of your creations I will post it for all to enjoy. Follow the sidebar at the right to see what the Dream Team has come up with this week.

Thursday, June 9, 2011

Thursday's Dream Schemes/Embossing on Colored Aluminum


I am very excited because next week I get to take a class from Magdalena Muldoon of Mercart. She is "the" expert when it comes to embossing on metal. The card that I am showing here this Thursday is done so simply. Magdalena sells colored aluminum sheets of metal and this creation was done by her rep in the Illinois area...Elaine Benedict. 

Elaine very simply ran the cathedral window quilt design (LJ808) through her Cuttlebug embossing machine on beautiful aqua colored aluminum and then sanded with a fine grit sanding block or manicure sanding block. It took off the top layer of color and left just the silver aluminum show through. Then she did the same thing with the Heliconia butterfly (LM257) on black colored aluminum and after sanding the raised layer of black color off she cut the butterfly out with small sharp scissors. She edged the background with a decorative wheel and mounted the aqua piece onto black shiny cardstock that she paste-embossed the Thank You (LM147) with Silver Embossing Paste (DSP) and then while it was still wet she added glitter.

If you are interested in using your embossing machine to emboss metals my suggestion is to use the stacking that I suggest for paper, but the thicker embossing mat is not necessary (a thin one that comes with the machine will work just fine) and of course you do not need to spray the back of the metal with rubbing alcohol like you do the paper. If you want the instruction sheet for dry embossing you can email me at lynell@dreamweaverstencils.com

This is a free challenge this week...this means you can do anything you would like, so if you get inspired join us by creating something and linking us into your blog. Occasionally one of you out there sends me a sample and I love to write about it, so if you get inspired to do so that will inspire me. Also take the time to visit the Dream Team and leave some comments....their names are on the sidebar to the right. Have a wonderful week!

Thursday, June 2, 2011

Thursday's Dream Schemes/Colorway Challenge Lavender and Gray

This week we are using Pam Hornschu's colorway of lavender and gray! Hooray!! I had fun doing this card. I paste-embossed with the Regular Embossing Paste (DEP). It has just a bit of a "tooth" (or roughness) to it and you can stencil onto it beautifully. It is also the fastest drying embossing paste and dries in about 25 minutes. I stenciled the leaves with gray pigment ink. Then stenciled the flowers with Brilliance Inks of Lavender, Orchid and Purple as seen in purple Tsukineko tri-color pad called Twilight. The main stencil is the Serendipity flower (LG709) and while it was drying then the Happy Birthday (LM248) was paste embossed with the Silver Embossing Paste (DSP) onto a purple plaid ribbon, I paste-embossed this on the ribbon first and then applied it with double stick mounting tape to the card later. I used a silver Krylon pen to make my three inch embellishment pin silver and when I placed it I tucked it under the flower card.

I am presently traveling in eastern Oregon and will be home at the end of the week, but we are hoping that you can join us and play along. Thank you for your nice comments the last few weeks and follow the Dream Team's names on the side bar at the right to see what they have posted in lavender and gray this Thursday.