Thursday, February 28, 2013

Thursday's Dream Schemes/Traveling in the UK and Guest Jane Gill

Black Tag Card by Jane Gill, friend and guest artist from the UK.
This past two weeks Pam Hornschu and I were traveling in the UK. My distributor Woodware Craft Collection was exhibiting at a trade show in Birmingham and we demonstrated at their booth there. It was wonderful to renew old friendships with their stamp designers and demonstrators. Today I am sharing with you a card made by guest Jane Gill, who has her own stamp collection with Woodware in the UK. She is starting to sell her stamps here in the USA as well, so stay tuned in the future for a heads up where those stamps may be purchased.

This wonderful tag card was made by using our three small vase stencils (LM194, 195 and 196). Jane very simply shaded them onto yellow ochre colored cardstock with brown ink and then cut them out with scissors. She then stamped them with a small branch stamp and paste-embossed our multi butterfly stencil design (LL513) using matte black embossing paste (DMBP). When the butterflies dried she stenciled them with a glue stamp pad and metallic f/x powders. The black tag card was stenciled with our plum blossom stencil (LL535) and white ink. The love kanji character is a a class apeal sticker. The details are lovely...she made little black paper shelves for the vases to sit on by folding a small piece of paper into a square tube and gluing them into place under the vases. Metallic gold ribbons finished off the look. Although it looks difficult every step is simply done. One of my favorite types of cards for simple elements...thank you Jane for sharing your lovely work with us! So appreciate visiting again while in the UK ...hopefully we will see more of your work and stamps here in the USA. And Jane if you are reading along and I didn't get something correct, please add a comment below. A very big thanks for sharing your beautiful card this week!

Now take a moment to visit the team's sites listed below. This month's challenge continues on with our CAS love and friendship theme. Our random winners will be selected on the weekend coming up. If you are playing along please post your card HERE on mr. linky. Pam Hornschu is still traveling in Ireland and will be back soon. She is staying connected with us via Facebook. She and I had one day in London together before we had to go to work and we had an unbelievable jaunt in the Victoria and Albert museum. They were showcasing a wonderful display of furniture and of course their regular exhibits are fabulous as well, so you may see some of her pix on Facebook if you visit.


Thursday, February 21, 2013

Thursday's Dream Schemes/ What are friends for...

By Wayne Harlow Zentangle card with the LM193 Dragonfly stencil 
The February challenge is all about love and/or friendships all done in the CAS format (Clean and Simple). Today I am doing a live television show in the UK called Create and Craft ...so click on that link to see what's happening across the pond with Dreamweaver Stencils. Because of the time difference you may not see me "live", but you might find one of my segments that they repeat through the evening and night hours. On the show I plan on CASEing the card you see here originally designed by my friend, Pam Hornschu, using the dragonfly stencil (LM193). I practiced like crazy and still wasn't quite satisfied, so Wayne (my best friend and hubby) spent some time teaching me and did the one on this post...(I put the pieces together). The practice is something that does pay off in the long haul. If you would like to see Pam's original card then purchase Suzanne McNeill's  Zentangle 6 book. This book shows how you can create the tangle patterns inside the Dreamweaver Stencils. Quite a few of the cards in the book are done by the Dreamweaver design team with our stencils. Zentangle is a new thing for me and I do enjoy it. The "Zen" portion of the artform is definitely something I benefit from and because of that I need to take more time to tangle than I do, it really helps cut down on the stress. Hope you'll have a chance to give it a try too and just maybe you will share the experience with a friend.

Don't forget to visit the design team's blogs and leave some love in the form of comments...they love it when you do. Click HERE to find out more about this month's challenge and to link your creation to mr. linky. Usually if you don't have a blog I will post it for you...however this month because of my travels you need to email your creation to louisehealy@sbcglobal.net and she will post it for you on my site.

Monday, February 18, 2013

Sue joins our February challenge!

Welcome Sue H to our February challenge of Love and/or Friendship! Sue sent us a photo of her beautiful double glitter card for the challenge. Here it is along with her invitation to visit her blog at:  http://cardandjewelrycorner.blogspot.com/


Great colors and so sparkly! Thanks for joining our fun Sue. Good luck!

Thursday, February 14, 2013

Valentine's Day ...my Favorite Friendship Day

LX7001 damask/LG672 lock and key PCP tutorial

OHHHH....how I love V-Day! When I was growing up Valentine's Day was one of my favorite holidays. At school red construction paper, Elmer's glue, pink crepe paper streamers and all sorts of candies, cookies and PTA mayhem made for awesome memories. Perhaps it was the beginning of my love of paper arts. How do these things get started? ...personal history is an interesting phenomenon and sometimes I just give up trying to remember how it all fits together and just enjoy those early memories as FUN stuff.

By the time you read this I will have landed at London Heathrow and be spending V-Day in London. So if you are joining our Friendship and Love Challenge this month and don't have your own blog to post on be sure to email your creation to louisehealy@sbcglobal.net and she will post it on my site for you. Click HERE to find out more about this month's challenge and what you could win and if you have a blog you can link your creation to mr. linky.

Today I am doing a tutorial on a printing technique that some people refer to as "letterpress", but in a nutshell it is done with any of the personal embossing machines and ink. I have the Cuttlebug, the Big Shot and the Tim Holtz Vagabond. Today I am using the manual Big Shot machine in my pictures. The "sandwich" or stacking method is pretty much the same for all three of these machines. Just remember to not "FORCE" the stack through your machine. You don't want to ruin your stencil or break the machine. You will need white 80# cardstock and for ink I will be showing how to use the Memories Mists sprays, because I love their vibrancy, but you could also add color to the stencil by tapping it with a wet ink pad. 


To prepare the Big Shot embossing machine I place the thick white plate on the machine with TAB 1 and 2 hanging down. (With this white plate those Tabs are attached as extra shims and sometimes you don't need the extra thickness, so they will just follow through as you crank your stack through the machine.) Then use a piece of copy paper on top of this plate to help keep it clean.


I always test my sprays in the corner of my cardboard spray box, holding the bottle as upright as I can so the atomizer can pump the spray from the bottom. For best results remember this TIP: Push the atomizer down hard and quick to avoid big droplet and drips. This first color of Memories Mists is Blue Martini (MM21).


Next place the stencil face down (I consider the "face" of the stencil the side with the stencil code and copyright on it ) onto a paper towel in the box and holding the bottle 9-12 inches away spray the stencil until it is covered with ink. You can spray it with several different colors. I added a bit of metallic gold Memories Mist (MM25) as well.


Now place the inked stencil gently onto the scrap paper with the inked side facing up for the printing process.


Carefully place the cardstock to be printed  onto the inked stencil's surface, being cautious not to shift or move the paper as you work. This will ensure that the print doesn't smear.


I hold the cardstock firmly with my left hand while I gently position the thick "Stamping Details" mat (REM) onto the cardstock...then carefully remove my hand from under the mat. If you only have a thin rubber mat you may need to use a few pieces of cardstock on top of your mat to "shim" the stack.


There are two acrylic plates for the Big Shot, (with the Cuttlebug these are referred to as "B" plates). Position these carefully onto the rubber mat.


Now crank the handle of the machine to roll the stencil sandwich you have made through the machine. This will finish the printing and also embossing process. Remember that the Tab 1 and 2 are not being used, but rather being rolled through the machine following behind the thick white plate.


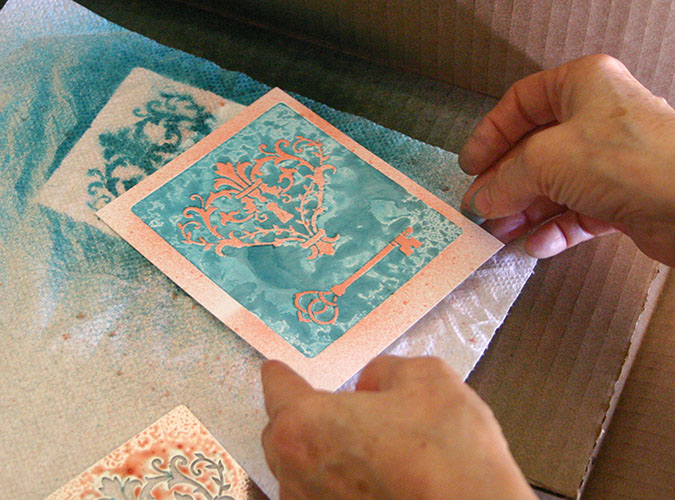
To add more interest I have made the lock and key that is now embossed a metallic copperish color. To do this I repositioned the stencil onto the embossed image and place it back into the cardboard spray box.


Spray the image with the copper shimmer Memories Mist (MM27). Remember to fully press the atomizer down all the way with a quick plunge for the best results.  If the paper is a bit warped I hold it down with my left hand for better coverage of ink. 


This portion of the card is ready to trim and mount, but set it aside to dry for now.


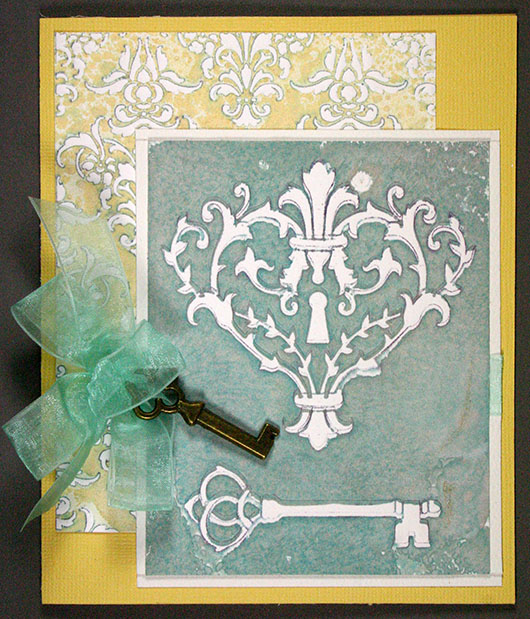
Now repeat the process with the damask/tapestry stencil (LX7001) on a square piece of the same 80# weight cardstock. This picture shows how it looks after it is embossed and printed through the machine and the finished card above shows it with the design stenciled with the copper shimmer spray.


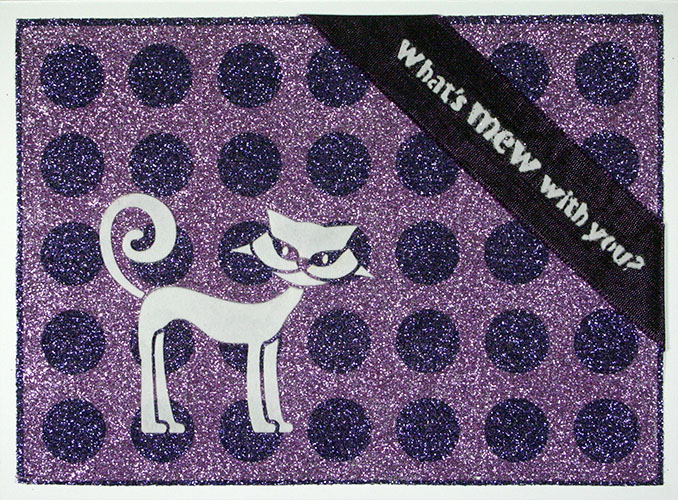
Below are two other cards that are just done with different colorways. Here's hoping you have a great Valentine's Day making turquoise and purple and yellow and green valentine's. Which brings up one more thing...Valentine's can be made and sent at any time of the year! Let's share the love and send a card to those we care about.


Background stencil is LX7001 Key stencil is LG672
I had fun embellishing these cards with metal keys and ribbons that I found at my local rubber stamp art store in Claremont Calif. 

Stamp Your Heart Out is a great place to spend an afternoon doing a make 'n take or watching a demo or taking a stenciling class. Whenever possible I encourage people to visit and support their local retailers. It keeps the industry on it's toes and fresh and innovative creativity alive as well. Go to www.dreamweaverstencils.com and click on the tab "where to buy" to find a store near you.


For another opportunity to win a stencil. Click HERE to leave a comment about your favorite stencil on this exact same technique shown on the Paper Craft Planet blog. (The winner is chosen randomly from the comments.)


Here's hoping you take sometime today and visit the blogs of our design team to see what they have been designing this week...they are a very talented group:

Wednesday, February 13, 2013

Nancy's Joining our Challenge

Nancy has taken me at my word and sent me a darling card of man's (or woman's) best friend!

What could be a better subject for our challenge this month of CAS (clean and simple) Friendship and/or Love?

She paste-embossed the dog stencil (LL3029) and the Celebrate stencil (LS90) with Dreamweaver Matte Black Embossing Paste (DMBP). Then traced the dog on the printed paper and cut him out with scissors, then glued him onto the dried embossing paste...leaving the tail, collar and nose showing just the black embossing paste.

Don't forget I will be gone...today I am flying to the UK and will be demonstrating on a TV show called Create and Craft, Feb 20, 21 and 22. You can watch me on-line. Click HERE to find their site. So....if you would like to join the challenge Louise Healy will post your cards on my site for me. Email them to LOUISE. And if you have your own blog link up your CAS creation with mr. linky by clicking HERE. Our random winner will win a stencil of their choice this month.

Thursday, February 7, 2013

February Challenge:CAS Love and Friendship

LL3021Standing Kitty stencil paste-embossed 
It is amazing how many of my friends are cat lovers! In fact, long time friend and fellow paper artist Diane Mauer loves cats, dogs and just about anything that is considered a "creature". (With the noted exception of spiders....but I've never known her to kill one.) In spite of being a cat lover she's also allergic to them, which does give one paws (ok a pun once in awhile is allowed) and just this past year she has a new kitty in her life. So I will be sending this card to her soon. Georgia Sommers post last week inspired me to stay better connected with friends. Need to send out my creations and connect. 

This month our challenge is centered around CAS (which stands for Clean AND  Simple) with an underlying theme of  Love and/or Friendship. Our winner will again be chosen randomly this month and the prize will be a stencil of your own choosing. So link up with mr. linky below to join the fun. This month I will be in the UK for a couple of weeks so if you are emailing me a card to put on the site after the 13th you should email it to louisehealy@sbcglobal.net otherwise until then you can email me at lynell@dreamweaverstencils.com We love getting your creations to post on the Dream it Up blog. Thanks for joining our monthly challenges.

Three different techniques are shown today:

1. The background Big Dot stencil (LX7011) was done with the double glitter technique. For the complete instructions email me at lynell@dreamweaverstencils.com and I will send them to you.

2. Paste-embossing the kitty words sentiment (LG741) on ribbon is quite simple. Just a matter of taping the ribbon down so that it doesn't move while you are pasting on top it. 

3. The standing kitty stencil (LL3021) was paste-embossed onto the double glitter background with the Dreamweaver Glossy White Embossing Paste (DGWP). 

Please take time to visit the design team's blogs to see what they have been creating for this month's love and friendship challenge AND don't forget to send a card to a friend or loved one.